First of all...
Welcome to the Blackwater Blog!
We decided to start an online blog so that we can share B&S updates and news, photos, tutorials, care guides, how-to's and more with you – our valued fans and loyal customers. In an age where all of man's recorded knowledge is at our fingertips, it is ironically easy to find ourselves overwhelmed when researching hobbies and passions that we might wish to pursue. Information overload often results in learned helplessness and stagnicity (which is precisely why we love the simplicity of the past), and many people will ultimately give up on their interests before they ever begin pursuing them. By learning about, understanding, and respecting the past, we are provided with a vessel through which we may deliberately slow down, reflect, and grow into the present and future. We hope that this blog will act as a central hub of knowledge that may accompany your on your journey into some of the simpler things that life has to offer – we couldn't be happier to have you here with us.
–Daniel D. Myers, President
and now...
Rubber Stamping: A Beginner's Guide
In this, our very first blog post, we will walk you through the ins-and-outs of rubber stamping so that you can create, journal, scrapbook & correspond with an unparalleled level of artistic finesse. Note that there are many kinds of stamps (from self-inking office stamps, to the small pre-inked stamps used by school teachers). In this article, we will limit our focus to the more traditional kinds of stamps: Wood-mounted and acryllic-block mounted rubber stamps.
If you'd like to create your own custom cards and paper crafts, but you don't know much about drawing, you may be a prime candidate for trying your hand at stamping. You don't need a bunch of expensive supplies, and it's a great way for teachers, stationery enthusiasts, and art-minded people of all ages to leave their creative mark. So where do you start? Well, first things first:
Obtain Rubber Stamps
Individual rubber stamps are not too expensive, but the cost of buying a lot of stamps can add up quickly, so it's a good idea to choose some general designs that have meaning to you and that can be used for multiple occasions.
Now, for crafting purposes, there are traditionally two types of rubber stamps:
- Stamps mounted onto wood blocks (usually with a wooden handle), and
- Stamps that are not mounted onto wood blocks.
Personally, I use both of the types listed above. Antique stamps are usually already mounted onto a wooden base, and it would break my heart to alter their original form (unless the rubber has crumbled and is now useless). As far as look, feel, and ease of usability, you really can't go wrong with wood-mounted stamps. However, there are only so many wood-mounted stamps one can own, as they take up a ton of space. Wood-mounted rubber stamps are not only difficult to store and organize, they are also some of the most expensive stamps you can buy, since you're also paying for the cost of the wood as well as the effort it took to mount the rubber stamping plate to the wooden base and handle.
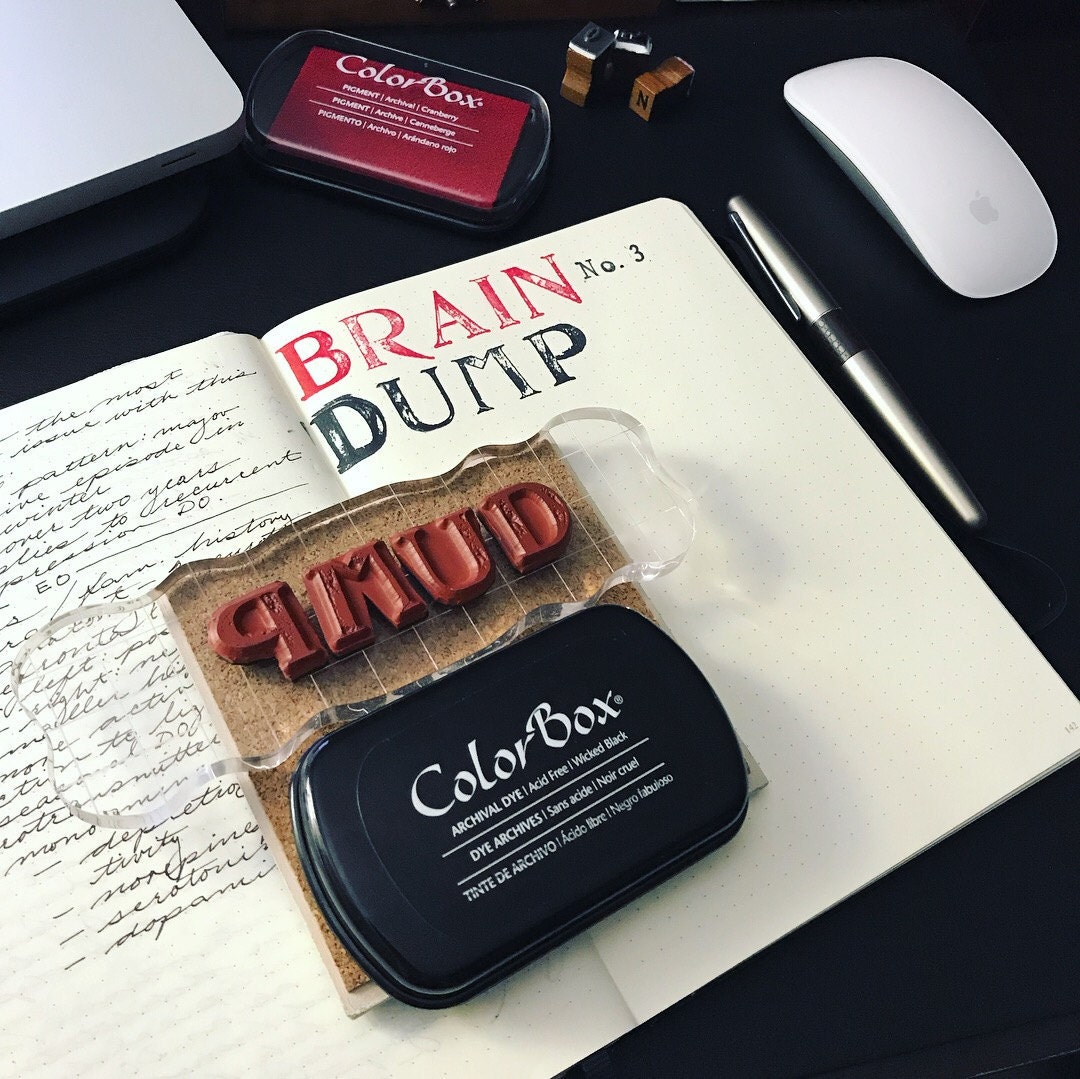
If you are willing to sacrifice nothing more than the visual aesthetic of your rubber stamps, and would instead prefer to pay as little money as possible while having maximum ease of storage and organization, then I suggest you go with unmounted red rubber stamps. These are essentially just thin plates of red rubber or clear silicone that have the stamp image cut into it.
"But, if there's no handle, how in the heck am I supposed to hold the stamp?" That's simple: permanently attach some Static Cling Foam to the bottom of your red rubber stamps, which from that moment forward allows them to forever 'peel-and-stick' to things like clear acryllic stamping blocks (so you can hold them during stamping). These little clear acryllic blocks are great because they are see-through and usually have built-in gridlines, so you can readily ensure that your stamp isn't crooked when you're finally ready to put it to paper. For clarity's sake, I will mention that one side of a Static Cling Foam sheet is made of permanent adhesive (for permanently attaching it to your rubber stamp), and the other side is the forever-reusable, 'sticky' side that allows for all of this magic to take place.
Clingfoam-mounted red rubber stamps are also maximally-efficient in regards to storing and organizing your stamps, as you can simply 'stick' them onto an 8x10 sheet of glossy photo paper when you're ready to put them away, and then store the stamp-covered photo paper sheets in a file or three-ring binder. Note that clear silicone stamps (readily found in most hobby stores) do not require clingfoam backing, as they will naturally stick to acryllic blocks and hang onto glossy photo paper as-is. However, we believe that red rubber stamps tend to leave a much higher-quality impression, and they far outlive their clear silicone counterparts. For this reason, we highly suggest that you use red rubber stamps.
Obtain an Inkpad
If you think that a standard black or off-red inkpad (the ones usually used with date stamps) is your only option, think again. Stamp pads come in an infinite variety of colors, so choose one or two colors that suit your style and get started. Note that there are many options to choose from when selecting an inkpad – and not all of it has to do with the color of the ink. Some inks/inkpads are made specifically for use with stamps that have fine lines and small details, and some inks/inkpads are made to be used with certain types of paper. Some inks are made to dry quickly, and some take a bit of time to dry.
When selecting an inkpad, you will notice that there are archival inks, pigment inks, detail-oriented inks, and many more. You'll also likely notice an array of cheap, basic stamping pads. For now, you really can't go wrong with any of the options that available to you. But it's just worth noting that there is a wide variety of inks/inkpads for you to choose from, should the one you start out with not suit your specific needs.
Stamp Away!
Press your stamp firmly and evenly down onto the paper, but don't "smoosh" the stamp down too hard. Then, simply lift the stamp squarely back up off the paper. Do not rock or jiggle the stamp, as doing so will almost certainly cause your stamped image to smear, and it may even cause damage to a stamp that has fine lines or small details cut into it.Your stamp should 'kiss' your paper.
Cleanup
Clean by simply ‘dry-stamping’ any excess ink onto a scrap piece of paper. Do this until the ink stops appearing on the scrap paper. It is unnecessary to thoroughly clean your stamps, as a *slight* bit of residual ink on the rubber may help produce a clearer image when the stamp is used in the future. Finally, store the inkpad upside-down to prevent the ink from settling to the bottom of the inkpad.